e-ID verification explained
In this blogpost I would like to show you how an e-ID verification can be implemented. You'll learn how to setup your application to support the verification flow and how to keep the involved data secure.

Technologies · 29.10.2025
To make this blogpost easier to understand we'll walk through the age verification feature we built for our demo shop which you'll find here: https://shop.playground.neovo.ch. And here you'll find the related blog post: The e-ID in Action: Buy Our Beer Now!.
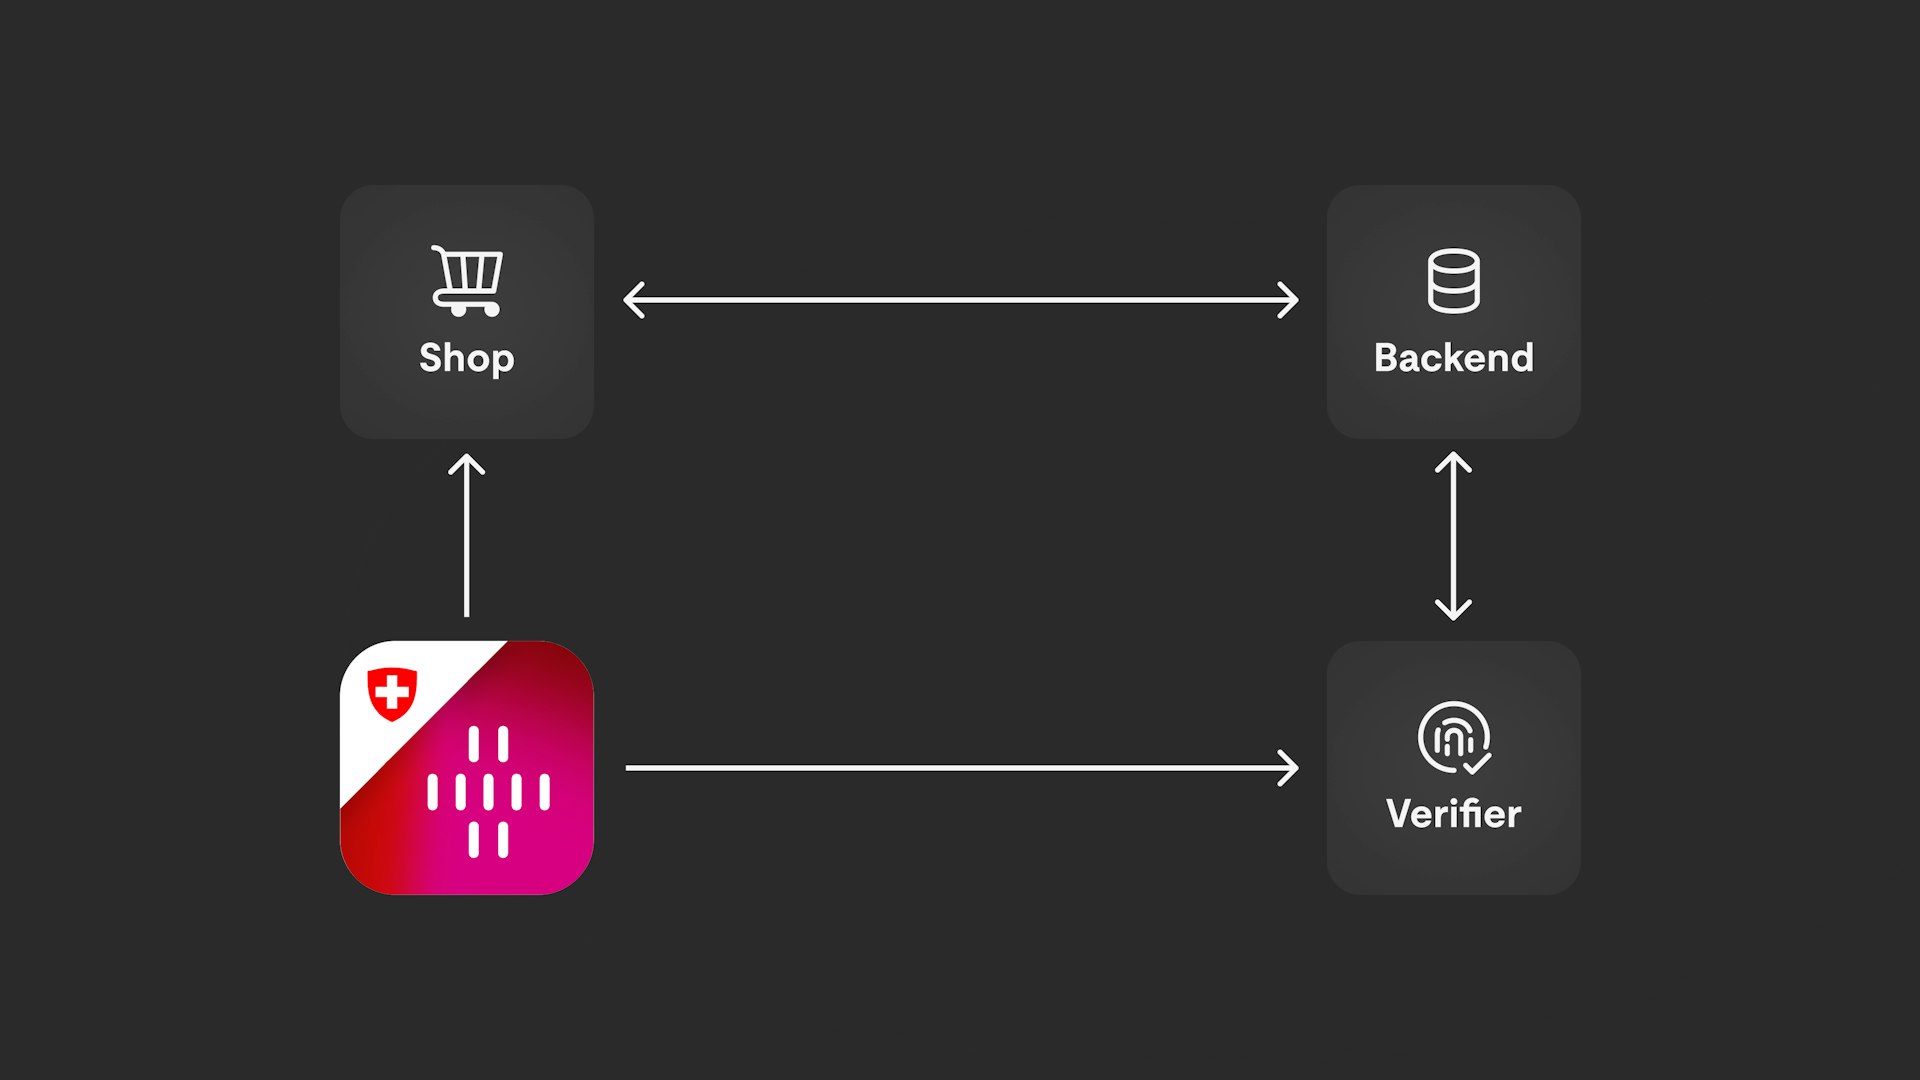
Involved services & applications
To start with I would like to give an overview of all the services involved in the e-ID verification setup.
Verifier service
The most important part of the e-ID verification is the verifier service. This service is responsible to perform the verification process and validate its requests against the trust network.
This service is meant to be self-hosted by the verifier entity itself as it is the only service (next to the client) which gets to know which person wants to do which verification. This is a crucial point as this information could be used to profile users and which shouldn't be done by a foreign organization (eg. via a SaaS service) or the federal government.
Shop backend
The shop needs to expose a public endpoint to the storefront which initializes a verification process with the verifier service and returns the verification id and link to it. To initialize a verification this endpoint defines which information is required to do a certain verification (In our demo case this is a boolean which tells the shop if the current user is at least 16 years old).
Storefront
The frontend calls the mentioned backend endpoint of our shop to initialize a verification process. It then displays the received verification link either as a QR-code or directly as a deeplink into the swiyu-App (depending on the device doing the verification).
swiyu App
The customer scans the QR-code to open the verification in the swiyu App. There they need to accept to share the requested data with the verifier service.
The big picture
The following picture should give you an overview of how the services work together during a verification request:
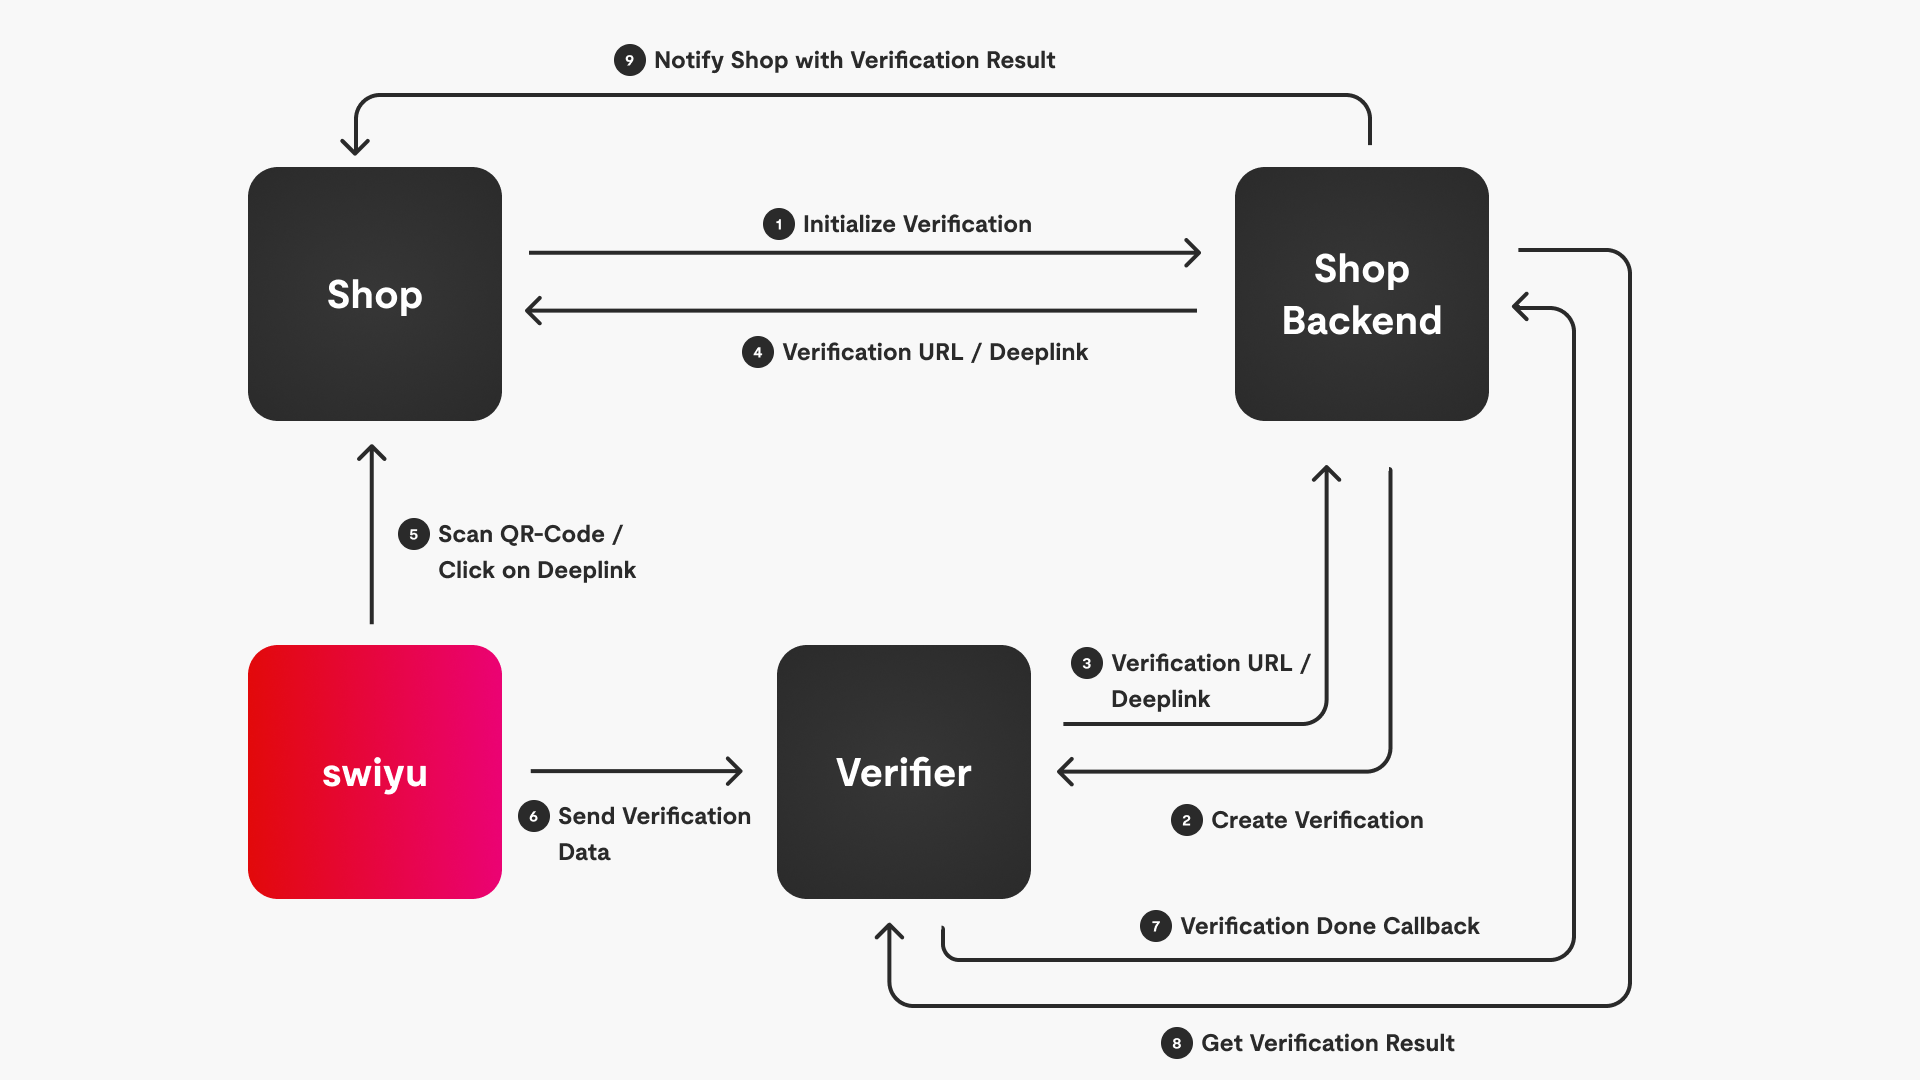
To initialize an e-ID verification our shop needs to call an endpoint of our shop backend.
The backend then creates a new verification request which includes the fields which should be requested from the customer and sends this to the verifier service.
The verifier service initializes a new verification and sends back the verification id as well as the verification URL & deeplink.
The shop backend sends this information back to the shop.
The shop displays a QR code of the verification url or deeplink which opens the swiyu App on the mobile phone of the customer.
In the swiyu app the customer approves to share the requested data which then gets sent directly to the verifier service.
The verifier service notifies the shop backend that the verification has been done.
The shop backend gets the verification result from the verifier service.
The shop backend then sends the verification result to the shop which can react accordingly.
Implementation in detail
Onboard on the swiyu trust registry
To be able to act as a verifier service you need to onboard yourself or your organization on the swiyu base & trust registry. To do this please follow this step-by-step guide provided by the fedaral government: https://swiyu-admin-ch.github.io/cookbooks/onboarding-base-and-trust-registry
In the end you should have your personal DID (decentralized identifier) as well as the public/private key pairs related to it. You'll need those to setup the verifier service described in the following steps.
Setup the verifier service
To setup a verifier service the federal government provides a generic verifier implementation which can be found here: https://github.com/swiyu-admin-ch/swiyu-verifier.
The easiest way to do this is to use the sample.compose.yml and .env included in the repository as a starting point.
Define the environment variables in the .env file to your own needs:
EXTERNAL_URL: This url should point to the verifier service itself. It is important that this url is reachable from the mobile device doing the verification request. This means that during development you should set it to the IP of the device running the verifier service. (eg.http://192.168.x.x:8083)VERIFIER_DID: Here you enter the DID you received during the onboarding process described above. (eg.id:tdw:AbC[...])VERIFIER_DID_VERIFICATION_METHOD: Here you enter the did including the verification method. It looks the same as the as the DID but is suffixed with something like#assert-key-01. (eg.id:tdw:AbC[...]#assert-key-01)VERIFIER_SIGNING_KEY: In this variable you need to paste the content of the private key of the DID Assertion Key Pair which was generated during the onboarding process. By default this file is calledassert-key-01.
Here you'll find detailed information about all the environment variables which can be defined in the swiyu-verifier: https://swiyu-admin-ch.github.io/cookbooks/onboarding-generic-verifier/#set-the-environment-variables.
Setup shop backend
We're assuming that you already have some kind of shop backend running. In our case this is a shop based on Vendure. As described above the backend needs to expose a public endpoint which initializes a verification request with the verifier service.
To do this we created a GraphQL mutation endpoint called initAgeVerification which creates a verification request to verify if the current user is at least 16 years old (legal requirement to buy a beer in Switzerland). This could of course also be a REST-endpoint or whatever your framework supports.
This endpoint then sends a POST-request to the /management/api/verifications endpoint of the verifier service with the following body content:
 {
    accepted_issuer_dids: ['did:tdw:QmPEZPhDFR4nEYSFK5bMnvECqdpf1tPTPJuWs9QrMjCumw:identifier-reg.trust-infra.swiyu-int.admin.ch:api:v1:did:9a5559f0-b81c-4368-a170-e7b4ae424527'], // <- DID of the e-ID issuer (optional)
    jwt_secured_authorization_request: false, // <- in a production setup this should be set to true
    presentation_definition: {
        id: '<unique-id>', // <- a generated unique id for the request (eg. uuid)
        input_descriptors: [
            {
                id: '<another-unique-id>', // <- another generated unique id for the request (eg. uuid)
                format: {
                    'vc+sd-jwt': {
                        'sd-jwt_alg_values': ['ES256'],
                        'kb-jwt_alg_values': ['ES256'],
                    },
                },
                constraints: {
                    fields: [
                        {
                            path: ['$.vct'],
                            filter: {
                                type: 'string',
                                const: 'betaid-sdjwt',
                            },
                        },
                        {
                           path: ['$.age_over_16'], // <- check if user is at least 16 years old
                        }
                    ],
                },
            },
        ],
    },
}
If the verification could be initialized properly the response contains (next to the given input) the following fields:
id: ID of the created verificationverification_url: URL to which the verification should be sent to from the swiyu-App.verification_deeplink: Link which can be used to display on mobile devices which have the swiyu-App installed to directly open the app and start the verification.
Finally our initAgeVerification endpoint returns those three values as the response to the storefront.
Setup storefront
The age verification can be done in different steps of the order workflow or during specific actions of the customer. Depending on your use case you could for example do the age verification as soon as the user starts the checkout process for an order which includes products which need age verification. For simplicity in our demo shop the customer needs to do the age verification before they are able to add such a product to the cart.
To initialize the age verification process the storefront needs to call our initAgeVerification-GraphQL-endpoint described above.
The response we get from this request include the id of the verification the verification_url and the verification_deeplink.
We create a QR-code for the received verification_deeplink and display it to the user. This can be done with a qr code library of your choice. In our case we're using qrcode. If the user is using our store with a mobile device we're also displaying a <a href="<verification_deeplink>">Verifiy age</a>-link so that the user can directly open the swiyu-App without scanning a QR-code first.
The swiyu-App then sends the verification result to the verifier service via the verification_url which is included in the verification_deeplink.
Callback to shop backend
As soon as the verifier service recieves an update for an open verification it attaches the wallet response to it as well sets the status to either FAILED or SUCCESS.
When this is done it needs to notify the shop backend so that this can check if the verification was successful or not.
To do this the verifier offers a webhook callback as soon as a verification is done. To use this we need to expose another endpoint which handles a POST-request from the verifier.
Create webhook callback endpoint in shop backend
In our example we created a REST POST-endpoint called /verification-done. This endpoint receives a JSON body with the following content:
{
    verification_id: "<ID>",
    timestamp: "<Unix timestamp>"
}
As you see we don't recieve any information about the verification itself. To get this information we need to do a GET request to the /management/api/verifications/<verification_id> endpoint of the verifier.
The response of this call retuns us all the information about the given verification as JSON. This data includes the current state of the verification as well as the wallet_response which looks like this:
 {
    state: 'PENDING' | 'SUCCESS' | 'FAILED';

    [...]

    wallet_response: {
        error_code: string | null;
        error_description: string | null;
        credential_subject_data: {
            age_over_16?: 'false' | 'true';

            [...]
        };
    };
}
The endpoint should now check if the expected verification was successful and sets the appropriate state for the current customer.
In our case we're using the following condition to do that:
!!(
    verificationResult.state === 'SUCCESS' &&
    verificationResult.wallet_response &&
    verificationResult.wallet_response.credential_subject_data.age_over_16 === 'true'
);
Check if the verification is in the
SUCCESSstate. This means that the user has approved to share the data in the swiyu-App. If they would decline the request thestatewould be set toFAILED.Check if the
age_over_16property of thewallet_response.credential_subject_datais'true'which means that the customer is at least 16 years old. Be aware that the value for this is astring(!) with the value'true'or'false'and not a realbooleantype.
If those conditions are true we know that the current customer is at least 16 years old and is allowed to buy beer in our shop. You can store this information directly on the customer or wherever it makes sense in your use case.
To tell the verifier service which webhook it needs to call as soon as a verification is done we can set the following environment variable:
WEBHOOK_CALLBACK_URI: This should point to the/verification-doneurl of your shop we created above.
Notify the frontend about the finished verification
The last part which needs to be done is to notify the frontend that the verification has been finished and update the state of it so that the customer is able to buy the beer (or of course not if they are not yet 16 years old).
This can be done in various ways. A common solution for such flows is to create a permanent connection to the client during the asynchronous process either via WebSockets or Server-sent events. This connection is kept open during the verification and is used to send the result of it to the client. Which solution is the best in your case depends mostly on what's the easiests for you to implement it. You should check if your backend solution already offers a specific solution for that.
In our demo shop we're using Server-sent events to make the communcation possible.
Our backend exposes a SEE-endpoint /updates/:verificationId which can be called with a verificationId by the client to initialize a connection and receive updates for this specific verification.
The shop calls this endpoint as soon as it recieves the verificationId in the response of the initAgeVerification call.
As soon as our backend receives the /verification-done callback by the verifier service and has checked if the verification was successful it sends a server-sent event to the client which listens to this specific verification.
That's it!
Phew, we now have a fully working example for an e-ID verification flow. To be honest it took me also a while to get everything running as expected. But for a product which is still under active development the verifier service as well as the whole verification flow is already really good documented by the federal government in their cookbook sections: https://swiyu-admin-ch.github.io/cookbooks/.
A word about security
For simplicity reasons I didn't mention anything about security in this blogpost.
Verifier /management endpoints
One critical part in this architecture is that our verifier service could be used by a third party to do it's own verifications. Right now this would actually be possible as the exposed /management API-endpoints are completely public. How to secure them is documented here: https://github.com/swiyu-admin-ch/swiyu-verifier?tab=readme-ov-file#security.
Shop /verification-done endpoint
The other part which needs to be secured is the /verification-done callback endpoint. This endpoint should only be callable by the verifier service. The verifier application offers the following environment variables which can be set to include an API key header in the request:
WEBHOOK_API_KEY_HEADER: Name of the header (eg.verifier-api-key)WEBHOOK_API_KEY_VALUE: The API key itself
In the shop backend you can now check this header value if the API key is correct. If this is not the case you can send a 401 Unauthorized-status back to the caller.