Use DatoCMS with a statically generated site (SSG)
Let's explore how we're using DatoCMS to edit the content of our statically generated site.

Development · 28.07.2025
Content isn't static
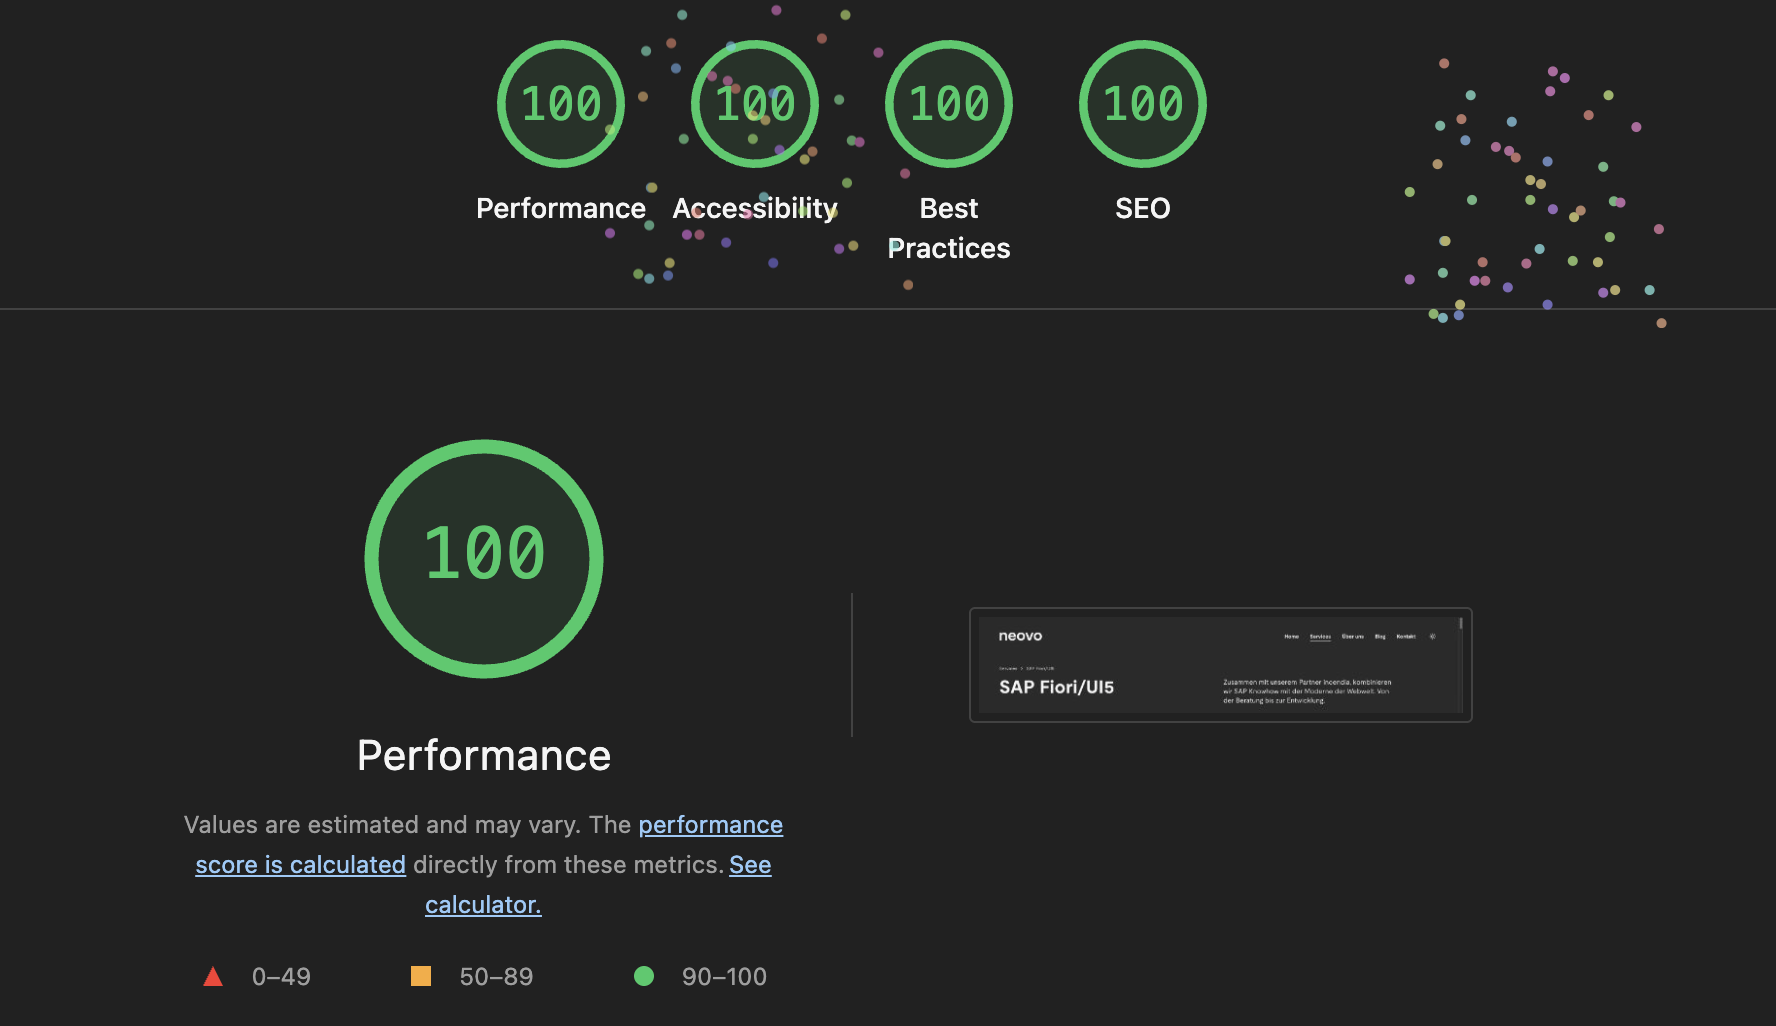
As we built our website neovo.ch we had the goal to see the fireworks (see image above) when running Google Lighthouse on it.
To achieve this there are a lot of performance- and UX-related things you need to be compliant to. The most important factor of course is page speed. And what could be the fastest possible implementation of any website? Of course when it is statically generated on build time (SSG) and served as pure pre-generated HTML. Like this no calls to a server are needed to render the page which makes it incredibly fast.
But as the content of our website and probably of most other websites is managed in a CMS you need to be able to regenerate your website as soon as content changes.
DatoCMS ❤️ SSG
DatoCMS provides a neat little features called Build triggers to do exactly this. Those can be found in the global "Project settings" of your DatoCMS instance. With build triggers the content editors get the possibility to manually trigger a new build of the website when they have finished modifying its content.
A build trigger can even be configured to run automatically when a scheduled publication or un-publication happens.
Configure a build trigger
DatoCMS already comes with pre-configured build triggers for some common CI tools (as Gitlab, Travis, CircleCI) as well as CDN hosting platforms (as Netlify and Vercel). If you're website isn't hosted or deployed with one of these platforms you can configure a custom build trigger. A build trigger is basically only a manually triggered POST request to a given URL (with some configured content if needed).
For our website neovo.ch we're using Forgejo to host our repositories which is a self-hosted alternative to GitHub. It's CI/CD solution uses the same API as GitHub Actions which means that the described solution below should also work when you're hosting your website on GitHub.
As there isn't a pre-configured build trigger for GitHub Actions we'll need to setup a custom build trigger by choosing "Custom webhook" when creating a new build trigger.
Build Trigger Name: Give the trigger a meaningful name so that your content editors recognize which trigger they need to select in which case. (eg. if you're having a production- and a staging-environment you should add this information to the trigger name).
Website frontend URL: The URL where the deployed website can be accessed.
Automatically trigger a build on scheduled publications/un-publications: Enable this option if you would like to trigger a build as soon as scheduled publication or un-publication of your content happens
Trigger URL: The trigger will send a POST request to this url. (see below under "Setting up the webhook on your CI/CD" to find out how this url is called)
Custom headers: You can define custom headers (eg. for authentication) here.
JSON payload: Here you can add some custom payload which can be used during the deployment (eg. to provide the target environment).
Setting up the webhook on your CI/CD
To be able to expose a webhook from a GitHub Action you need to add workflow_dispatch to the on array of your workflow (additional information about manually running a workflow: https://docs.github.com/de/actions/how-tos/manage-workflow-runs/manually-run-a-workflow):
name: Deploy GitHub Action

on:
  push:
  workflow_dispatch:

[...]
With this definition the action can be triggered by calling the following URL:
https://<repositoryUrl>/api/v1/repos/<owner>/<repo>/actions/workflows/<workflowName>/dispatches
When calling this webhook an additional body parameter ref is required. It is used to know on which git reference the workflow should run. This can be a branch or a tag name.
In our case we have two different deployment jobs defined in the workflow: deploy_stage and deploy_live. Both are using an if-condition based on the git reference to decide which deployment should be triggered:
jobs:

  deploy_stage:
    name: 'Deploy to Stage'

    # only run on stage branch
    if: github.ref == 'refs/heads/stage'

    [...]

  deploy_live:
    name: 'Deploy to Live!'

    # only run on main branch
    if: github.ref == 'refs/heads/main'

    [...]
This means we need to specify the following JSON payload in our Build trigger:
// JSON payload for "Deploy to Live"-Build Trigger
{
  "ref": "main"
}
// JSON payload for "Deploy to Stage"-Build Trigger
{
"ref": "stage"
}Setting up the status notification of your webhook
The last thing we need to do is to notify DatoCMS after the deployment job has finished. You can do this by copying the given curl requests below Step 2: Status notifications and add them to your workflow steps.
In our case this looks like this:
jobs:

  [...]

  deploy_stage:
    name: 'Deploy to Stage'

    [...]

    steps:
      - name: Notify DatoCMS on success
        if: ${{ success() && github.event_name == 'workflow_dispatch' }}
        run: |
          curl -n -X POST https://webhooks.datocms.com/<buildTriggerId>/deploy-results \
            -H 'Content-Type: application/json' \
            -d '{ "status": "success" }'

      - name: Notify DatoCMS on failure
        if: ${{ failure() && github.event_name == 'workflow_dispatch' }}
        run: |
            curl -n -X POST https://webhooks.datocms.com/<buildTriggerId>/deploy-results \
            -H 'Content-Type: application/json' \
            -d '{ "status": "error" }'
Ready to deploy!
Your editors should now have a new button in the upper right corner of the DatoCMS backend called "Build status".
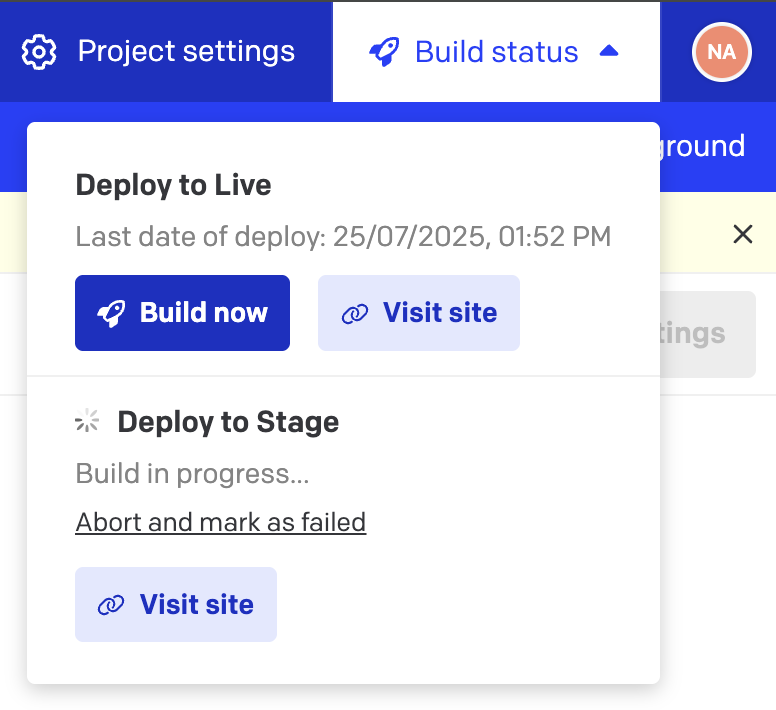
By clicking it a menu opens in which the configured builds can be manually triggered. It even shows if there is currently a deployment in progress or if the last deployment was successful or failed.